Subscribe To Roll-Kraft
Receive the latest news from Roll-Kraft.

BASIC ROLL-FORM TOOLING DESIGN:
PROCESS OVERVIEW, INSTRUCTION, AND TIPS
1.0 INTRODUCTION
This paper is intended to provide “basic” Roll Forming Tooling design instruction and tips for the beginning or novice designer. In my experience, the ideas expressed in this report can be applied to many situations, but I will stop short of claiming that these are the only solutions. Many roll designers have different approaches to both design and development (testing of tooling), and amazingly enough, there is more than one way to successfully form a profile. However, there are common design practices that must be understood and applied to the design process, coupled with a certain degree of “magic” (gained through previous experiences).
In other words, a mixture of science and art is still very prevalent today in this industry. For a Roll Forming Tooling design, considering all the variables and applying “theory” whenever possible is vital in producing a good running product, with minimal start-up problems. Because the roll forming process has a seemingly limitless capacity to produce complex profiles with just as many variables, a high percentage of designs are one-of-a-kind. This is why theory can only go so far. Past experiences, correctly applied, are still the key ingredients to the design and development of these applications.
More commonly formed, or basic, shapes tend to have fewer variables and limitations, which in turn have higher levels of results that are both theoretical and repeatable. With this in mind, we will only scratch the surface in this “basic” design guide. The basics are essential for the beginning designer.
2.0 DESIGN PROCESS OVERVIEW
For each new tooling requirement, the designer should use the following steps:
After the cross-section has been finalized, and before the rolls can be designed, the proper number of passes and rolling mill must be determined. At the same time, other questions need to be answered, such as:
3.0 CALCULATING THE ESTIMATED STRIP WIDTH
Probably the most common problem associated with designing Roll Forming Tooling is predicting how a forming bend will react during the rolling process. Using the proper “K” factor or “Bend Allowance” is the main item the designer must consider when calculating a strip width. Various factors contribute to the bend allowance, such as material type and yield strength, profile characteristics, such as large radii or 180-degree bends, and roll design techniques.
When calculating strip widths and designing rolls, the maximum thickness within the gage range is generally used. This is done to eliminate interference between the male and female rolls when the material is passing through. Unfortunately, many companies purchase their raw materials to the low side of the thickness range, to net more footage per ton, which leads to a lesser quality cross-section (poor dimensional and bend characteristics). The use of restricted tolerance material will greatly improve part consistency but is rarely done, due to increased costs for raw materials.
FIG #1: C-CHANNEL CROSS-SECTION WITH MATERIAL AND MILL SPECS 
First, consider the material to be formed. Using steels with yield strengths of 30-55 KSI with forming angles of around 90-degrees and a 1t – 5t inside bend radius, a “k” factor between 35-40% of the material thickness is most common. Higher yield materials between 60-85 KSI (with a low elongation percentage), a factor between 40-55% may be necessary. For bend angles over 120-degrees and inside bend radius less than 1t, the “k” factor should be around 50%. Again, these examples are only a general rule of thumb for typical roll formed bends.
Note that the strip widths should always be considered an estimate, and it is important not to order large quantities of raw material prior to proving the tooling. There are instances where the width will need to be modified during testing.
4.0 FLOWER DEVELOPMENT
After the estimated strip width is calculated, the flower can now be developed by using the “arc” and “straight” lengths. This basic C-channel will be the example given. On typical C-channels, the return leg (bend #2) is the first forming to be done. I like to form this leg to approximately 70-80 degrees in three passes depending on the length of the leg. This angle is important because if formed all the way to its finished angle of 90-degrees, access to the inside corner of bend #1 will be limited in the later passes. By keeping bend #2 open 10 to 20 degrees, one additional pass will have contact with bend #1. The final 10 to 20 degrees of forming would take place after the last pass that contacts bend #1.
Forming a bend that does not have a roll holding the inside corner, is called “air”, “blind”, or “ box” forming. When this occurs, forming the remaining angle from bend #2 helps to reduce distortion in the radius of bend #1.
FIG #2: EXAMPLES OF AIR FORMING AND FLOWER WITH ROLL CONTACT 
If the bend corner of #2 has a pre-punched slot or hole, it would be better to finish the bend while #1 is flat (0-degrees forming), because any forming in the later passes would increase distortion to and around the notch. However, I would still hold the return leg as shown above, after contact with the inside corner is no longer possible. This will prevent bend #1 from lifting while minimizing bend # 2 distortion.
FIG #3: 3D VIEW OF NOTCHED BEND 
The chart below describes where the forming takes place. The angles shown are how much forming is being done at each pass.
FIG #4: FLOWER BASED ON CHART WITH CALCULATIONS
| PASS | BEND 1 | BEND 2 |
| 1 | 0 | 28 |
| 2 | 0 | 23 |
| 3 | 0 | 19 |
| 4 | 12 | 0 |
| 5 | 16 | 0 |
| 6 | 17 | 0 |
| 7 | 20 | 0 |
| 8 | 13 | 12 |
| 9 | 9 | 11 |
| 10 | 6 | 3 |
*SEE NOTE BELOW RE 12-PASS OPTION.

The following layout describes how to determine the theoretical radii for the bends. The radii that are calculated are considered a “reducing” or “constant length” type, which means that in every forming pass, the entire “arc length” (.4285”) is being used within the radius. This is why the earlier passes have larger radii, when not completely formed to the finished angle of 90 degrees. There are other forming methods used for bends, such as “constant radius”, “arc-in”, & “arc-out.” These methods have certain advantages and disadvantages, but for the most part, the “constant length” method is most widely used. In many cases, I like to calculate all the passes using this method, to develop the progression and then sharpen the radii in the early passes slightly to help the section track properly.

Over-forming a bend beyond the finished angle is necessary to account for material spring-back. In this example section where the material is .060” CRS with a yield strength of 35 KSI, a 2- or 3- degree over-form is required to overcome the spring-back effect. Materials that have high elongation rates (aluminum, for example) may only need 1 degree, while high-strength and high-yield materials may require 5 to 15 degrees of over-form. NOTE: The amount of over-form can vary, based on numerous cross-sectional characteristics such as section depth, size of the inside radius, thinner material running through tooling designed for thicker, and the amount of “air” forming involved. Try to avoid over-forming more than one bend at the same pass, because the operator may need to control one more than the other, using roll pressure. In the chart above, bend #2 is over-formed at pass #9, then allowed to spring back to 90-degrees at pass #10. Bend #1 is over-formed in pass #10.
Care should be taken to limit the amount of lateral and vertical movement the material is subjected to from pass to pass, especially lateral movement. Note how this flower progression is forming more at first and less towards the end. The material flows more laterally, once the forming angle approach 90-degrees. This increases load against the forming rolls and creates many problems, like marking or scuffing, end-flare, twist with asymmetrical profiles, and camber, or bow.
In pass #10, we are over-bending #1. There is no “finish pass.” This allows the mill operator more control of the finished forming angle of bend #1 and, at the same time, minimizes end-flare as opposed to a more traditional over form/finish pass.
FIG #5: OVERFORM / FINISH PASS EXAMPLE

When developing the flower the designer must consider the correct number of passes. This ten-pass example should be okay if running non-notched, post-cut mild steel. If the section is either notched, pre-cut or high strength material, more passes will be necessary to achieve desired results. Additional passes allow the material to flow through the mill with less strain. This is a must, especially for pre-cut blanks. The pre-cut lengths must self-feed through every pass without damaging the lead edge of the strip. A good rule of thumb is to try to design all roll passes to self-feed even when running coil stock. The mill operator should not have to feed a new coil and “pry” the section into the next pass.
*NOTE: If end-flare is a concern and a “finish pass” is desired, consider adding two more passes to this ten pass example. Pass #11 would unfold Bend #1 to approximately 86 degrees and pass #12 would re-form Bend #1 to the finished angle of 90 degrees. The use of this unfolding/re-forming method would improve angle and flare control.
5.0 ROLL LAYOUT
After the flower has been completed, the designer needs to choose drive diameters and check for maximum flange roll sizes and possible interference with the rolling mill. “Step-up” or increasing the pitch diameters of the rolls from pass to pass is important to consider during the design phase. In many situations “overfeeding” or “buckling” between passes (particularly in the early stages) will occur. This problem is caused when the material (especially lighter gages) from a previous pass is driving faster than the next. The amounts of “forming torque” and “surface contact” on the rolls are the key factors as to why this problem exists. However, after the profile has ample column strength, step-up can be reduced or eliminated. With pre-notched applications, caution should be taken not to overly increase drive diameters, because this may lead to increased part lengths and/or distorted notches.
General guidelines for Step-up:
Pre-notched materials (.015” to .030” gage): Use approximately .010” diameter step-up per pass.
Thin gage/non-pre-notched (.015 to .030” gage): .050” diameter step-up passes 1-3, .030 diameter passes 4-up.
Our .060” C-Channel example (non-notched): .030” diameter step-up all passes.
Other solutions to overfeeding can be idling key spindles on the mill or idling key forming rolls, clearance angles on rolls that appear to be driving too hard or reducing roll diameters in a previous pass.
FIG #6: ROLL LAYOUT WITH DRIVE AND FLANGE DIAMETERS 
With the drive diameters chosen, the vertical centers are 7.060” and fall between the 4” to 8” range. The maximum roll diameter shown is based on the required “flange” needed for smooth material transition from the previous pass. It is important to check that this maximum diameter does not interfere with the mill base or any other maximum diameter from an adjacent pass. The location of the profile on the roll space, roll widths, and spacer lengths are also determined in this layout.
6.0 ROLL DESIGN
These days, almost all companies use some sort of computer-aided design software in their engineering departments. With this in mind, specific calculations will not be covered; rather, a visual description is shown.
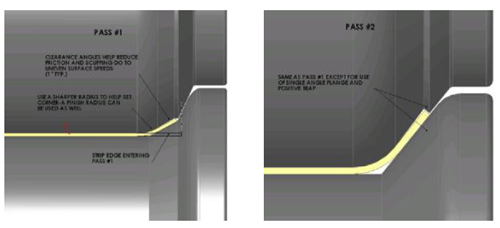
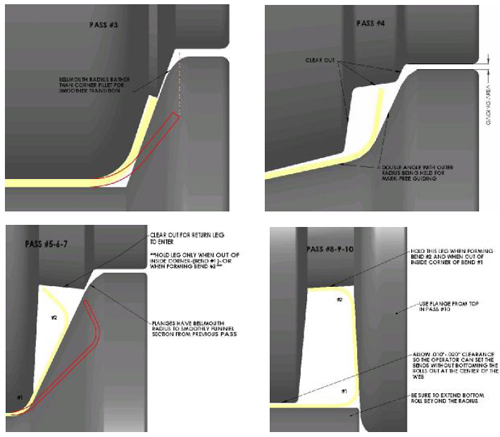
FIG #7: PASS LAYOUTS WITH DESCRIPTIONS


TYPES OF “TRAP” ROLLS:


7.0 ROLL DESIGN TIPS When forming a bend that has a 1t or less inside radius and when “box” forming, a “coining” or “bead” pass is very effective in setting the corner. By coining the material a slight thinning will occur. However, the finished bend corner will be crisp.
FIG #8: COINING PASS

Another tip to reduce material scuffing is to idle flange rolls so they are not driven. The speed at which these idled rolls spin is dictated by the section (at or near the highest point of the leg) rather than the mills’ drive. Generally this method is necessary when the formed legs of the profile are greater than 70-degrees.
FIG #9: IDLED FLANGE CROSS-SECTION

8.0 TOOLING ACCESSORIES
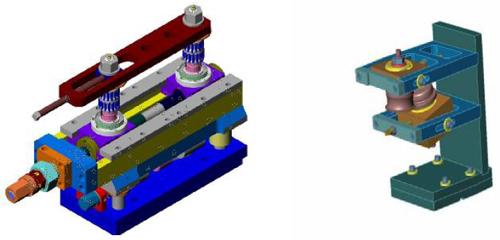
Most sections require a straightening device after forming which removes unwanted twist, camber and bow. These straighteners are normally a “block” type (made from Aluminum bronze or nylon) but can also be done with rollers. The key to straightening is to have the device fairly close to the last pass (between the last two passes if pre-cut strips). The length of the block should be long enough to achieve approximately 1”-1-1/2” of working area (or land), while incorporating a good lead-in and exit radius or taper. The clearance around the profile should have about .015” per side and more at the strip edges. Avoid trying to fully contain the profile because if the device is adjusted it may also affect the geometry of the cross-section.
FIG #10: STRAIGHTENER: BLOCK & ROLL TYPE AND FIXTURE

Side Rolls, or rolls that are mounted on a vertical axis and located between passes, are an excellent way to help a profile enter the main roll passes. These are especially good for light- and heavy-gage materials alike. Thinner gages tend to spring, while heavy gages have high lateral forces against the flanges. In addition to smoothing out the forming transition between passes, side rolls also reduce the scuffing of the vertical legs, because they spin on the same axis that the profile travels.
FIG #11: TYPICAL SIDE STAND & CUSTOM DESIGN BETWEEN PASS SIDE ROLL STAND

9.0 CONCLUSION
Although this C-channel example may not represent your particular requirement, it does contain all of the same steps that are needed to complete a roll design. There is much more that could be added in this report detailing other areas of a design. Again it is only meant to give the beginning designer a guide and hopefully, it will be used as a reference to help you. Good luck!
Basic Roll-Form Tooling Design:
SolidWorks drawings by: Chaz Rau Roll-Kraft Inc. Email: crau@roll-kraft.com
On-Time Delivery
First Time Performance
Simply contact us here or call and get answers 24/7.
Contact Us (888) 953-9400
Roll-Kraft is pleased to announce the appointment of Mr. Mike Samplak to the position of Plant Manager at its headquarters facility in Mentor, OH.

Roll-Kraft is pleased to announce the appointment of Frank Lowery to Vice President of Roll Form Applications.

Roll-Kraft is pleased to announce the appointment of Kevin Gehrisch to the position of President.